> ## Documentation Index
> Fetch the complete documentation index at: https://docs.customei.com/llms.txt
> Use this file to discover all available pages before exploring further.
# Canvas size and print output
> Set the size your product prints at, choose the file you receive with each order, and connect the template to an option set.
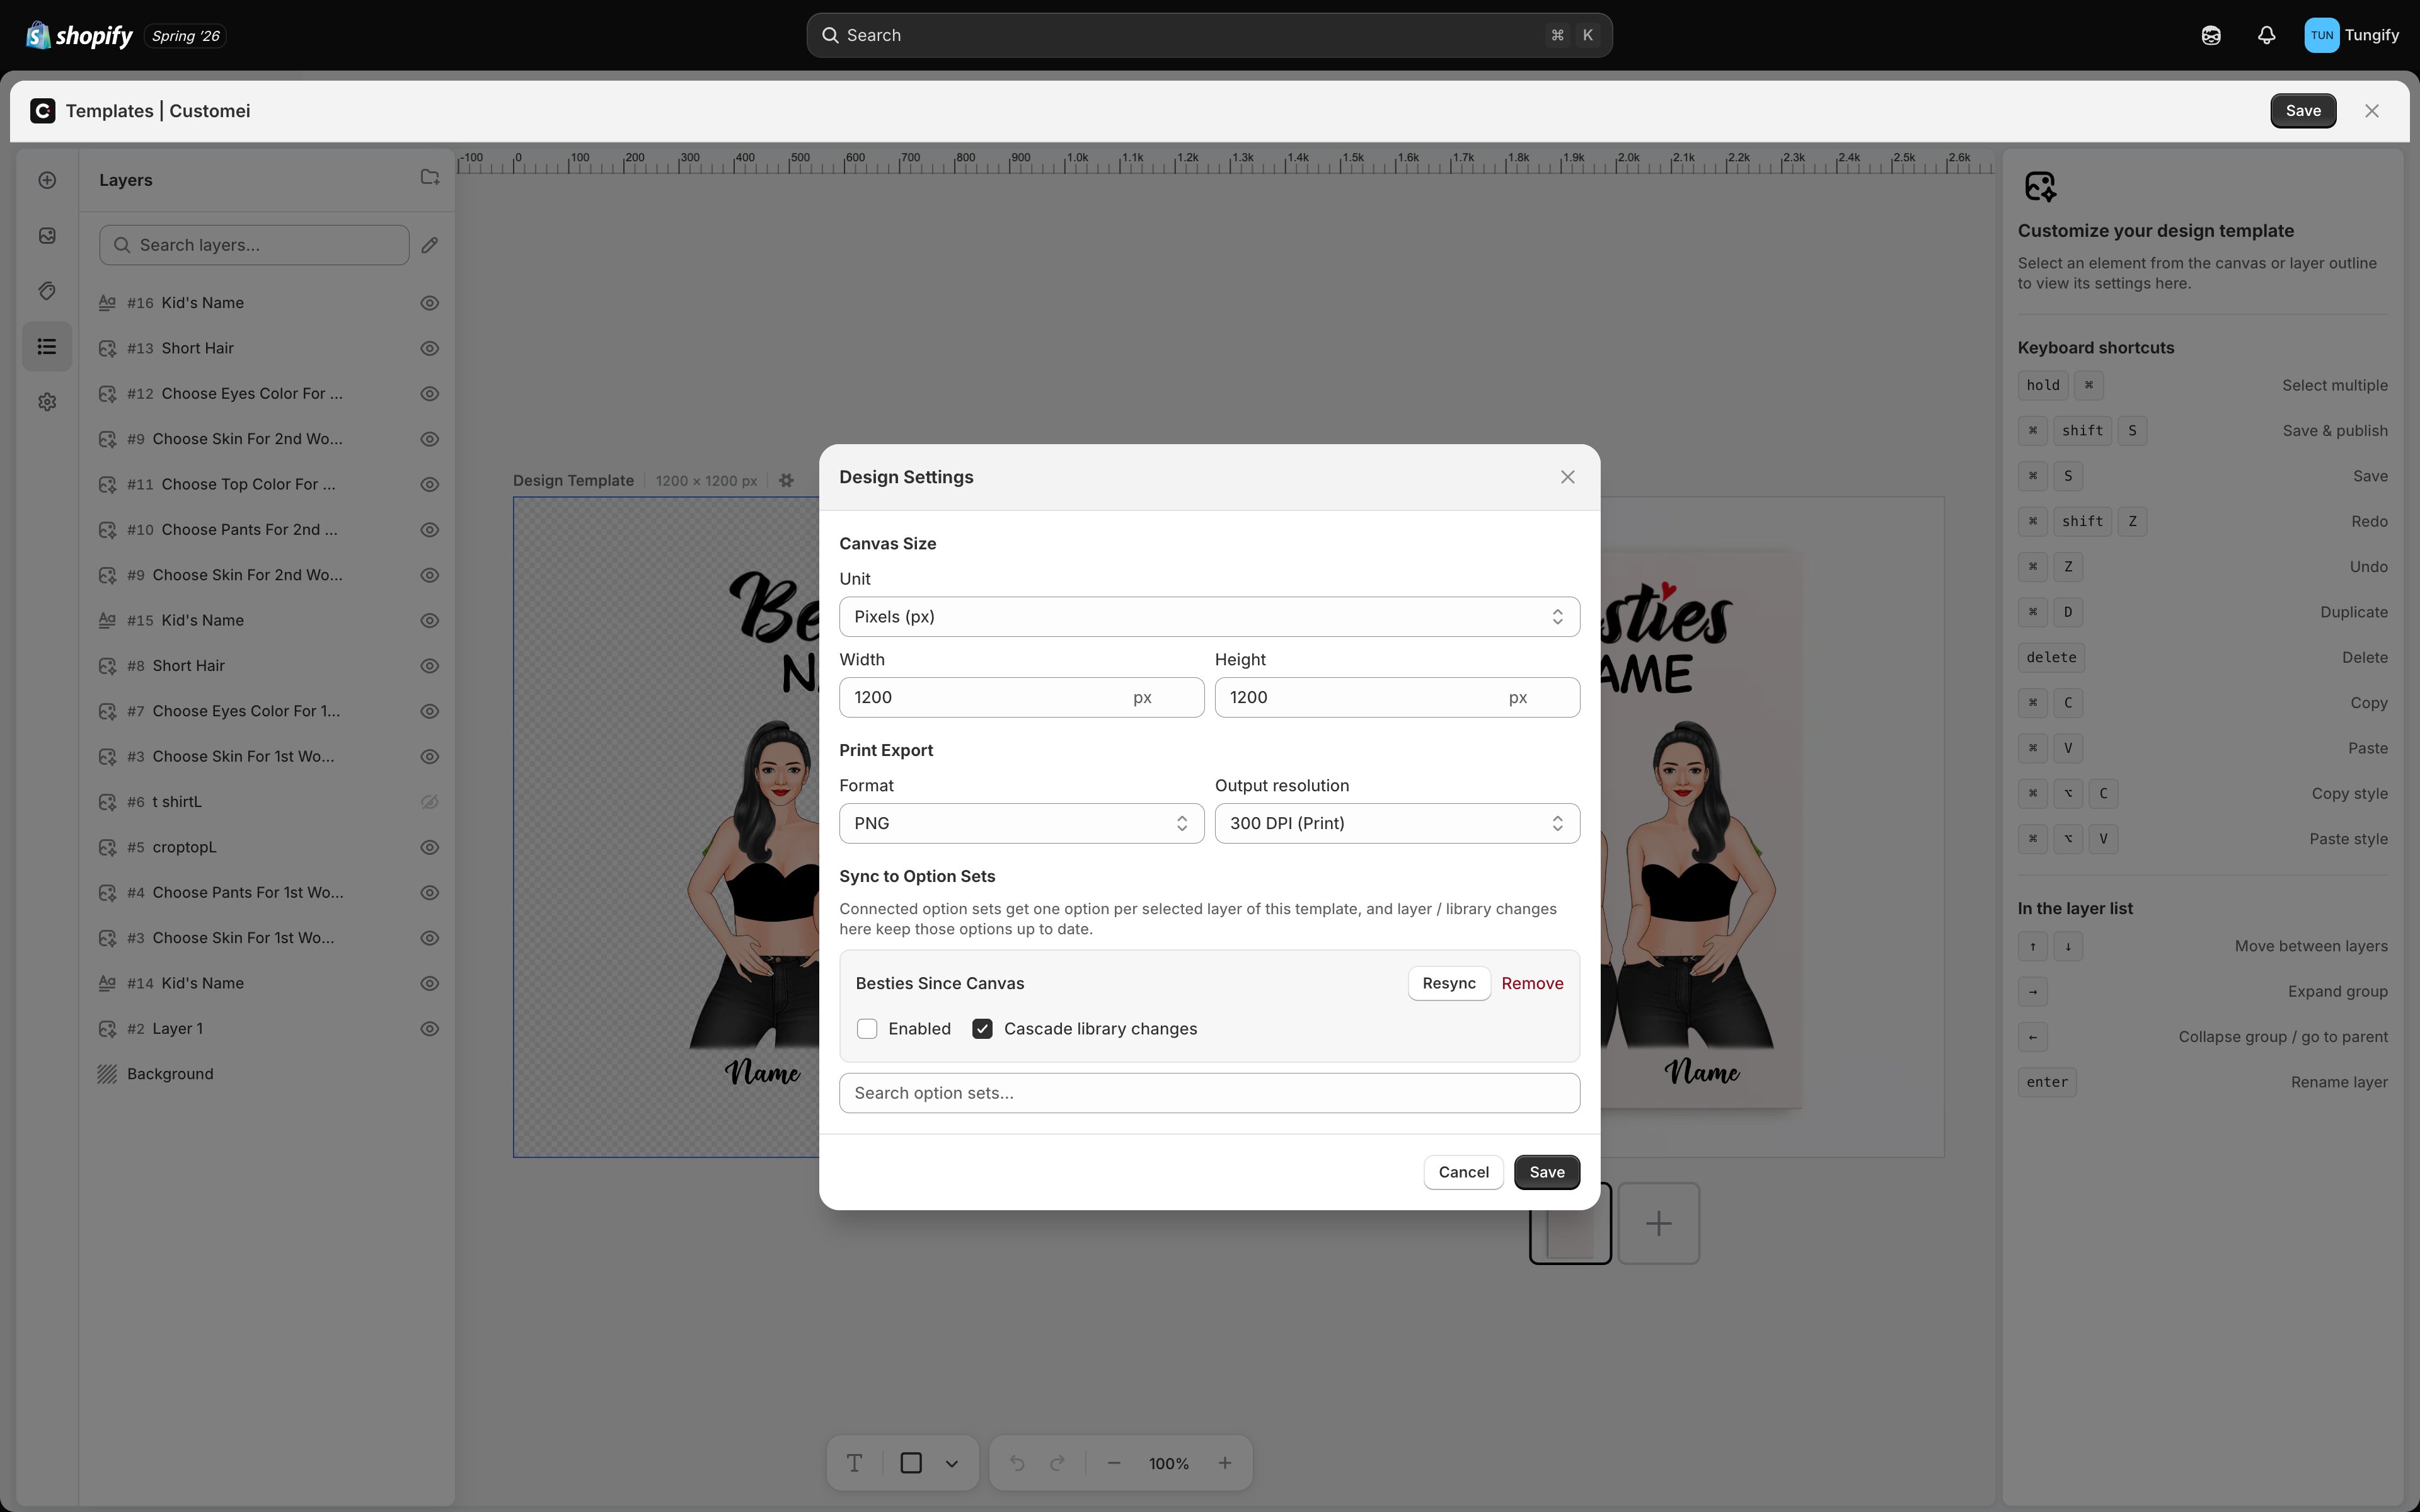
Everything about a template as a whole lives in one place: how big it is, what file you get when someone orders, and which option set follows it. That place is **Design Settings**.
Open your template in the editor and click the gear icon on the **Design Template** label above the canvas.
 ## Canvas size
The canvas is the printable area of your product. Set it once, at the size you actually print.
| Setting | What it does |
| ---------------------- | ------------------------------------------------------------------------------ |
| **Unit** | Pixels, centimetres, millimetres or inches |
| **Pixel density** | Only for real-world units. How many dots make up one inch: 72, 150, 300 or 600 |
| **Width** / **Height** | The size, in the unit you chose |
Working in centimetres or inches is easier to think about: a 20 x 25 cm canvas at 300 dots per inch is a print shop's idea of a photo print. Working in pixels is fine too, and the box under each measurement shows you the pixel size either way.
Changing the **Pixel density** of a template that already has artwork rescales every layer so the artwork keeps its physical size, and **this cannot be undone**. The window warns you before it happens. Decide the density before you build, not after.
The largest canvas allowed is 8192 pixels on a side. Anything over 4096 gets a warning, because a canvas that big makes the editor slow to work in.
## Print export
This is the file you receive when someone orders.
| Setting | Choices |
| --------------------- | -------------------------------------------------------------------------- |
| **Format** | PNG, JPG, TIFF, PDF, EPS, AI (Adobe Illustrator), DXF (AutoCAD) |
| **Output resolution** | 72 (screen), 150 (medium), 300 (print) or 600 (high quality) dots per inch |
| **Colour mode** | RGB or CMYK |
The window only shows the settings that matter for the format you chose: resolution for PNG, JPG and TIFF; colour mode for PDF, EPS and AI. Under **Output resolution** it also tells you the exact pixel size of the file you will get.
| If you | Choose |
| ---------------------------------------------------- | ---------------------- |
| Print yourself, or send to a print-on-demand partner | **PNG** at **300 DPI** |
| Send files to a commercial printer | **PDF** in **CMYK** |
| Work with a cutting machine or engraver | **DXF** or **EPS** |
| Only need a preview, never a print | **JPG** at **150 DPI** |
**PNG at 300 DPI** is the right answer for almost every print-on-demand product. Only move to PDF or CMYK if your printer has asked you for it.
Ask your printer what they want before you settle this. A file in the wrong colour mode is the most common reason a print comes back looking duller than the screen.
## Which option sets follow this template
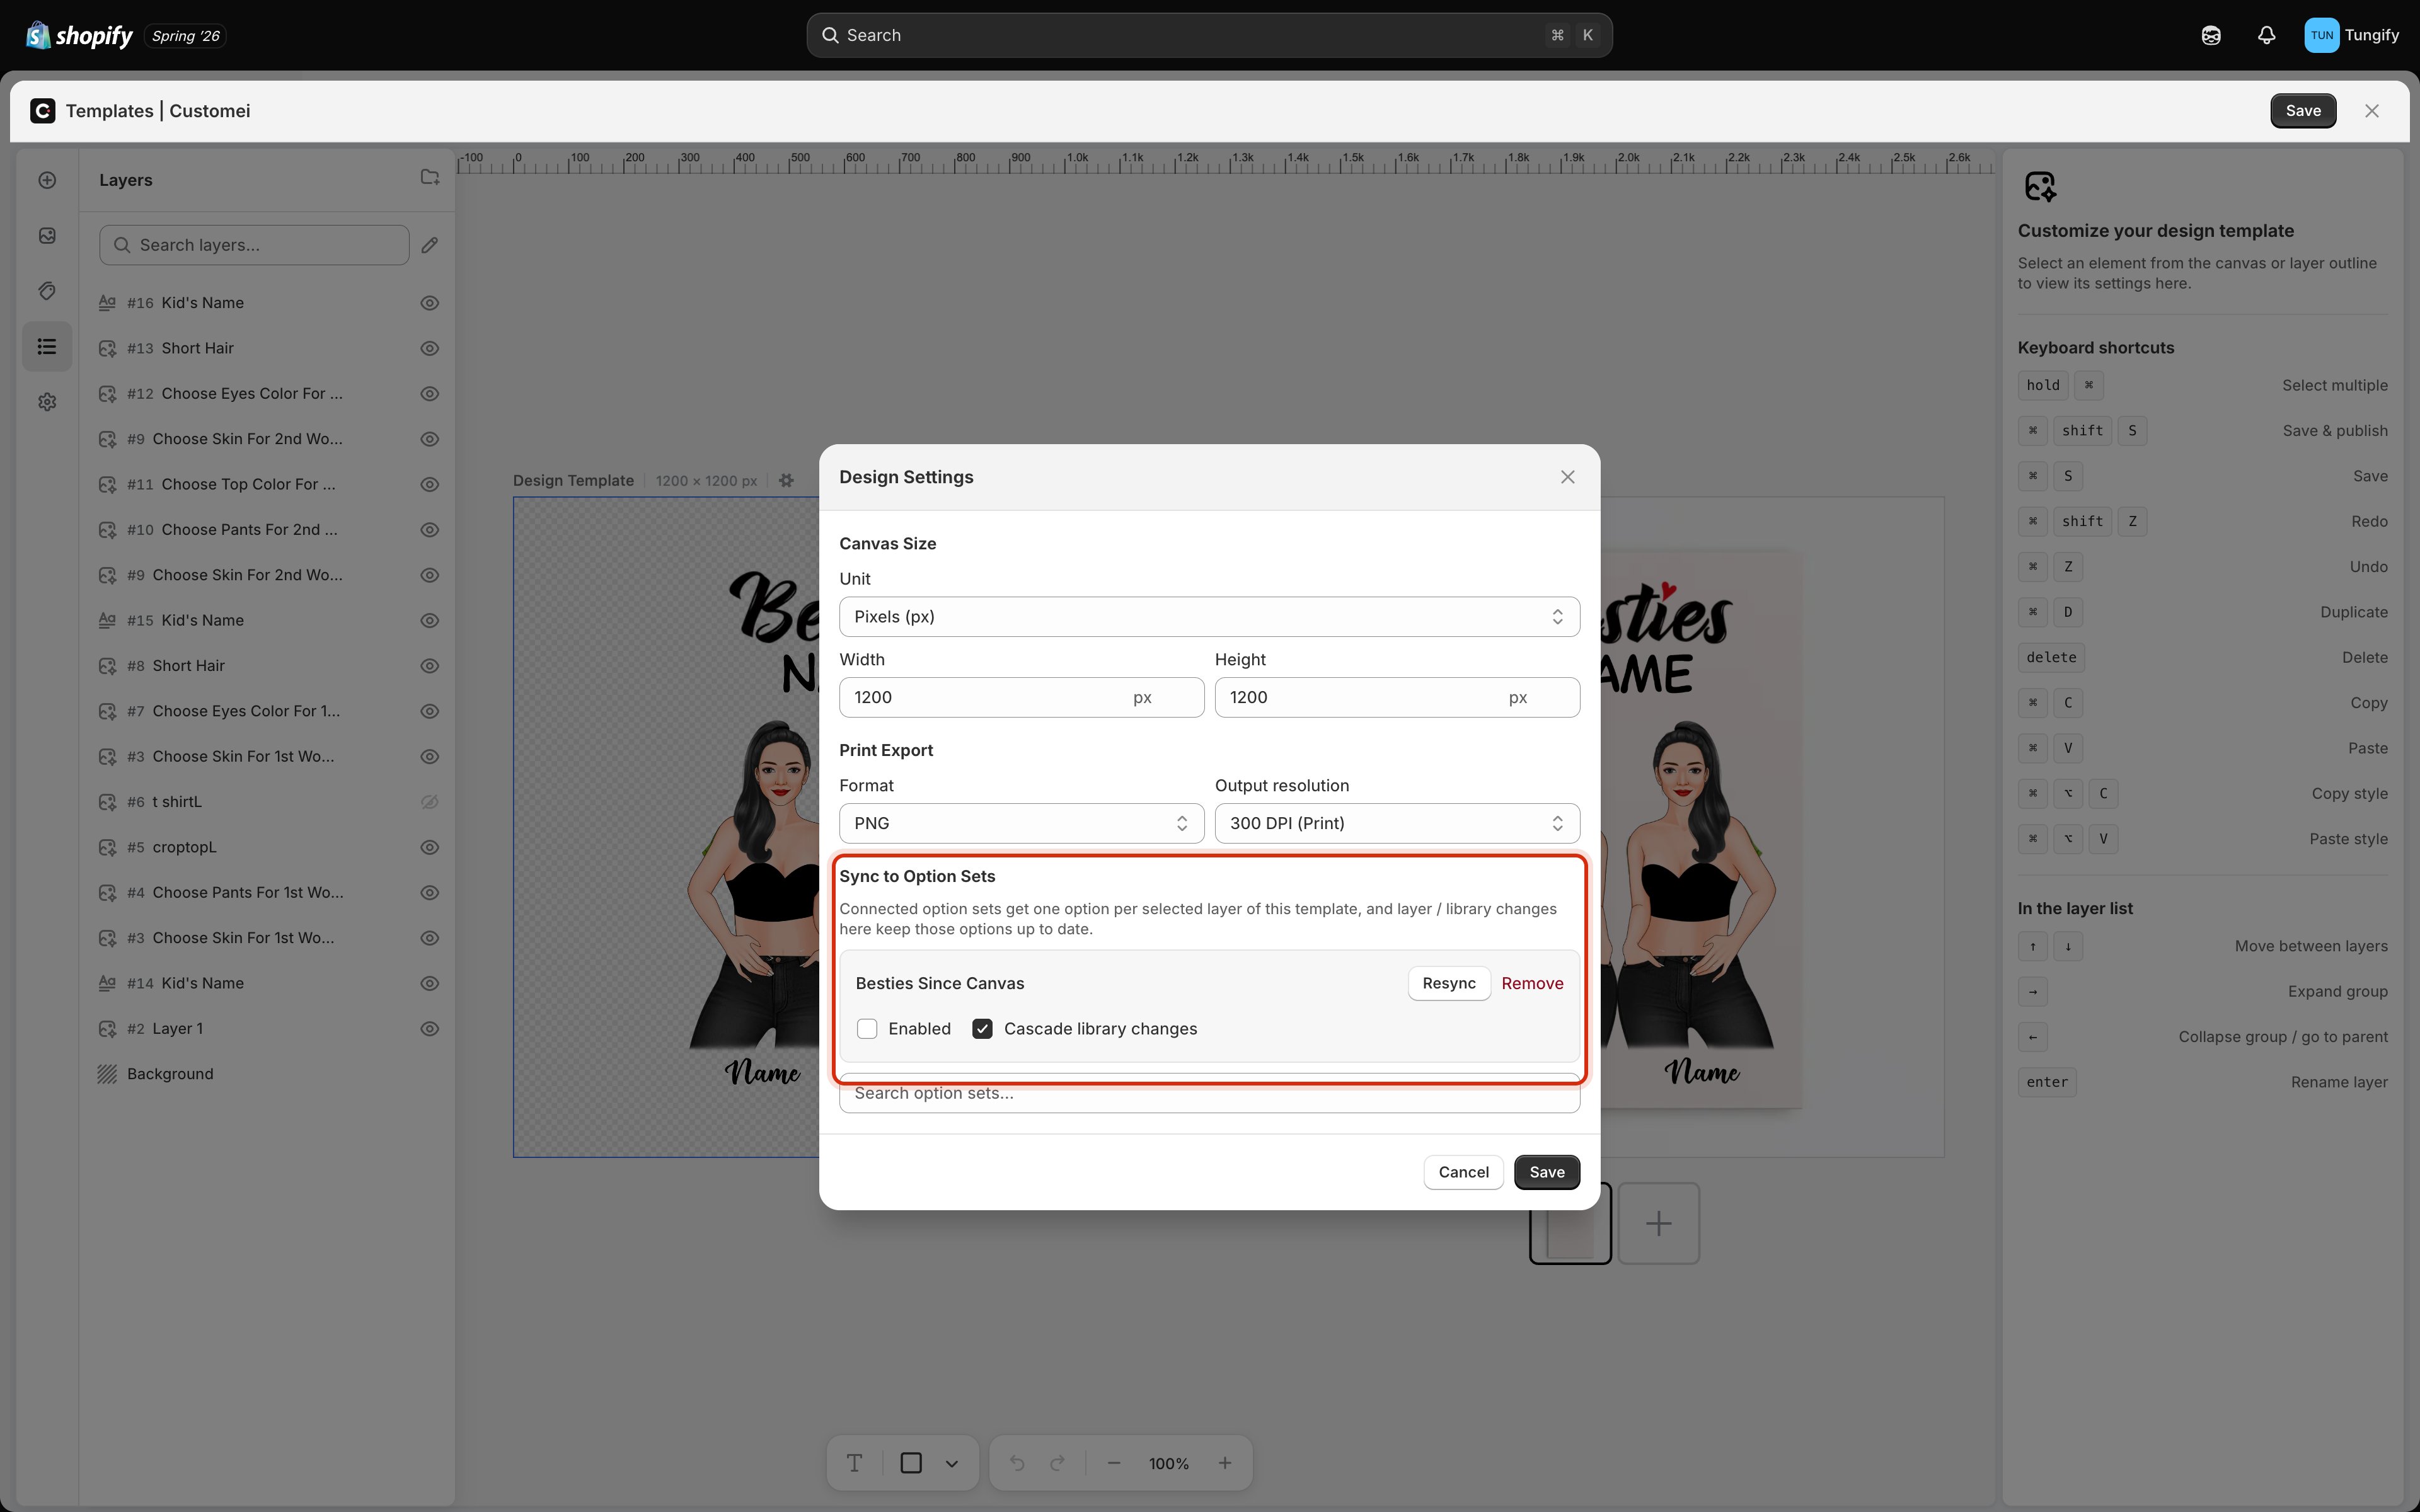
The last section, **Sync to Option Sets**, is where a template and an option set are tied together. When they are tied, the option set gets one question per layer you chose, and later changes to those layers keep the questions up to date.
## Canvas size
The canvas is the printable area of your product. Set it once, at the size you actually print.
| Setting | What it does |
| ---------------------- | ------------------------------------------------------------------------------ |
| **Unit** | Pixels, centimetres, millimetres or inches |
| **Pixel density** | Only for real-world units. How many dots make up one inch: 72, 150, 300 or 600 |
| **Width** / **Height** | The size, in the unit you chose |
Working in centimetres or inches is easier to think about: a 20 x 25 cm canvas at 300 dots per inch is a print shop's idea of a photo print. Working in pixels is fine too, and the box under each measurement shows you the pixel size either way.
Changing the **Pixel density** of a template that already has artwork rescales every layer so the artwork keeps its physical size, and **this cannot be undone**. The window warns you before it happens. Decide the density before you build, not after.
The largest canvas allowed is 8192 pixels on a side. Anything over 4096 gets a warning, because a canvas that big makes the editor slow to work in.
## Print export
This is the file you receive when someone orders.
| Setting | Choices |
| --------------------- | -------------------------------------------------------------------------- |
| **Format** | PNG, JPG, TIFF, PDF, EPS, AI (Adobe Illustrator), DXF (AutoCAD) |
| **Output resolution** | 72 (screen), 150 (medium), 300 (print) or 600 (high quality) dots per inch |
| **Colour mode** | RGB or CMYK |
The window only shows the settings that matter for the format you chose: resolution for PNG, JPG and TIFF; colour mode for PDF, EPS and AI. Under **Output resolution** it also tells you the exact pixel size of the file you will get.
| If you | Choose |
| ---------------------------------------------------- | ---------------------- |
| Print yourself, or send to a print-on-demand partner | **PNG** at **300 DPI** |
| Send files to a commercial printer | **PDF** in **CMYK** |
| Work with a cutting machine or engraver | **DXF** or **EPS** |
| Only need a preview, never a print | **JPG** at **150 DPI** |
**PNG at 300 DPI** is the right answer for almost every print-on-demand product. Only move to PDF or CMYK if your printer has asked you for it.
Ask your printer what they want before you settle this. A file in the wrong colour mode is the most common reason a print comes back looking duller than the screen.
## Which option sets follow this template
The last section, **Sync to Option Sets**, is where a template and an option set are tied together. When they are tied, the option set gets one question per layer you chose, and later changes to those layers keep the questions up to date.
 | Control | What it does |
| --------------------------- | --------------------------------------------------------------------------------------------------------------------------- |
| **Search option sets** | Connects another option set to this template |
| **Enabled** | Turns the automatic updating on. Untick it and the option set keeps the questions it has, and stops following this template |
| **Cascade library changes** | Also passes on changes to the picture and colour libraries the layers use, such as a new photo added to a linked library |
| **Resync** | Runs the update once, now |
| **Remove** | Disconnects that option set from this template |
A connection with **Enabled** unticked is the usual reason a **Sync values** button never appears on an option set. Tick it here and the option set starts following the template again.
Turning on **Enabled** for an option set you built by hand will add questions for the layers in this template. If you have carefully written your own questions, leave it off and update them yourself.
The option-set side of this story, covering the seeding banner, the per-question badges and **Reset to library values**, is on [keep options up to date](/optionsets/keep-options-up-to-date).
## Where to next
What happens on the option-set side when a template changes.
Sizes, presets and the editor tour.
| Control | What it does |
| --------------------------- | --------------------------------------------------------------------------------------------------------------------------- |
| **Search option sets** | Connects another option set to this template |
| **Enabled** | Turns the automatic updating on. Untick it and the option set keeps the questions it has, and stops following this template |
| **Cascade library changes** | Also passes on changes to the picture and colour libraries the layers use, such as a new photo added to a linked library |
| **Resync** | Runs the update once, now |
| **Remove** | Disconnects that option set from this template |
A connection with **Enabled** unticked is the usual reason a **Sync values** button never appears on an option set. Tick it here and the option set starts following the template again.
Turning on **Enabled** for an option set you built by hand will add questions for the layers in this template. If you have carefully written your own questions, leave it off and update them yourself.
The option-set side of this story, covering the seeding banner, the per-question badges and **Reset to library values**, is on [keep options up to date](/optionsets/keep-options-up-to-date).
## Where to next
What happens on the option-set side when a template changes.
Sizes, presets and the editor tour.