> ## Documentation Index
> Fetch the complete documentation index at: https://docs.customei.com/llms.txt
> Use this file to discover all available pages before exploring further.
# Bulk edit values
> Paste in a whole list of choices at once instead of adding them row by row.
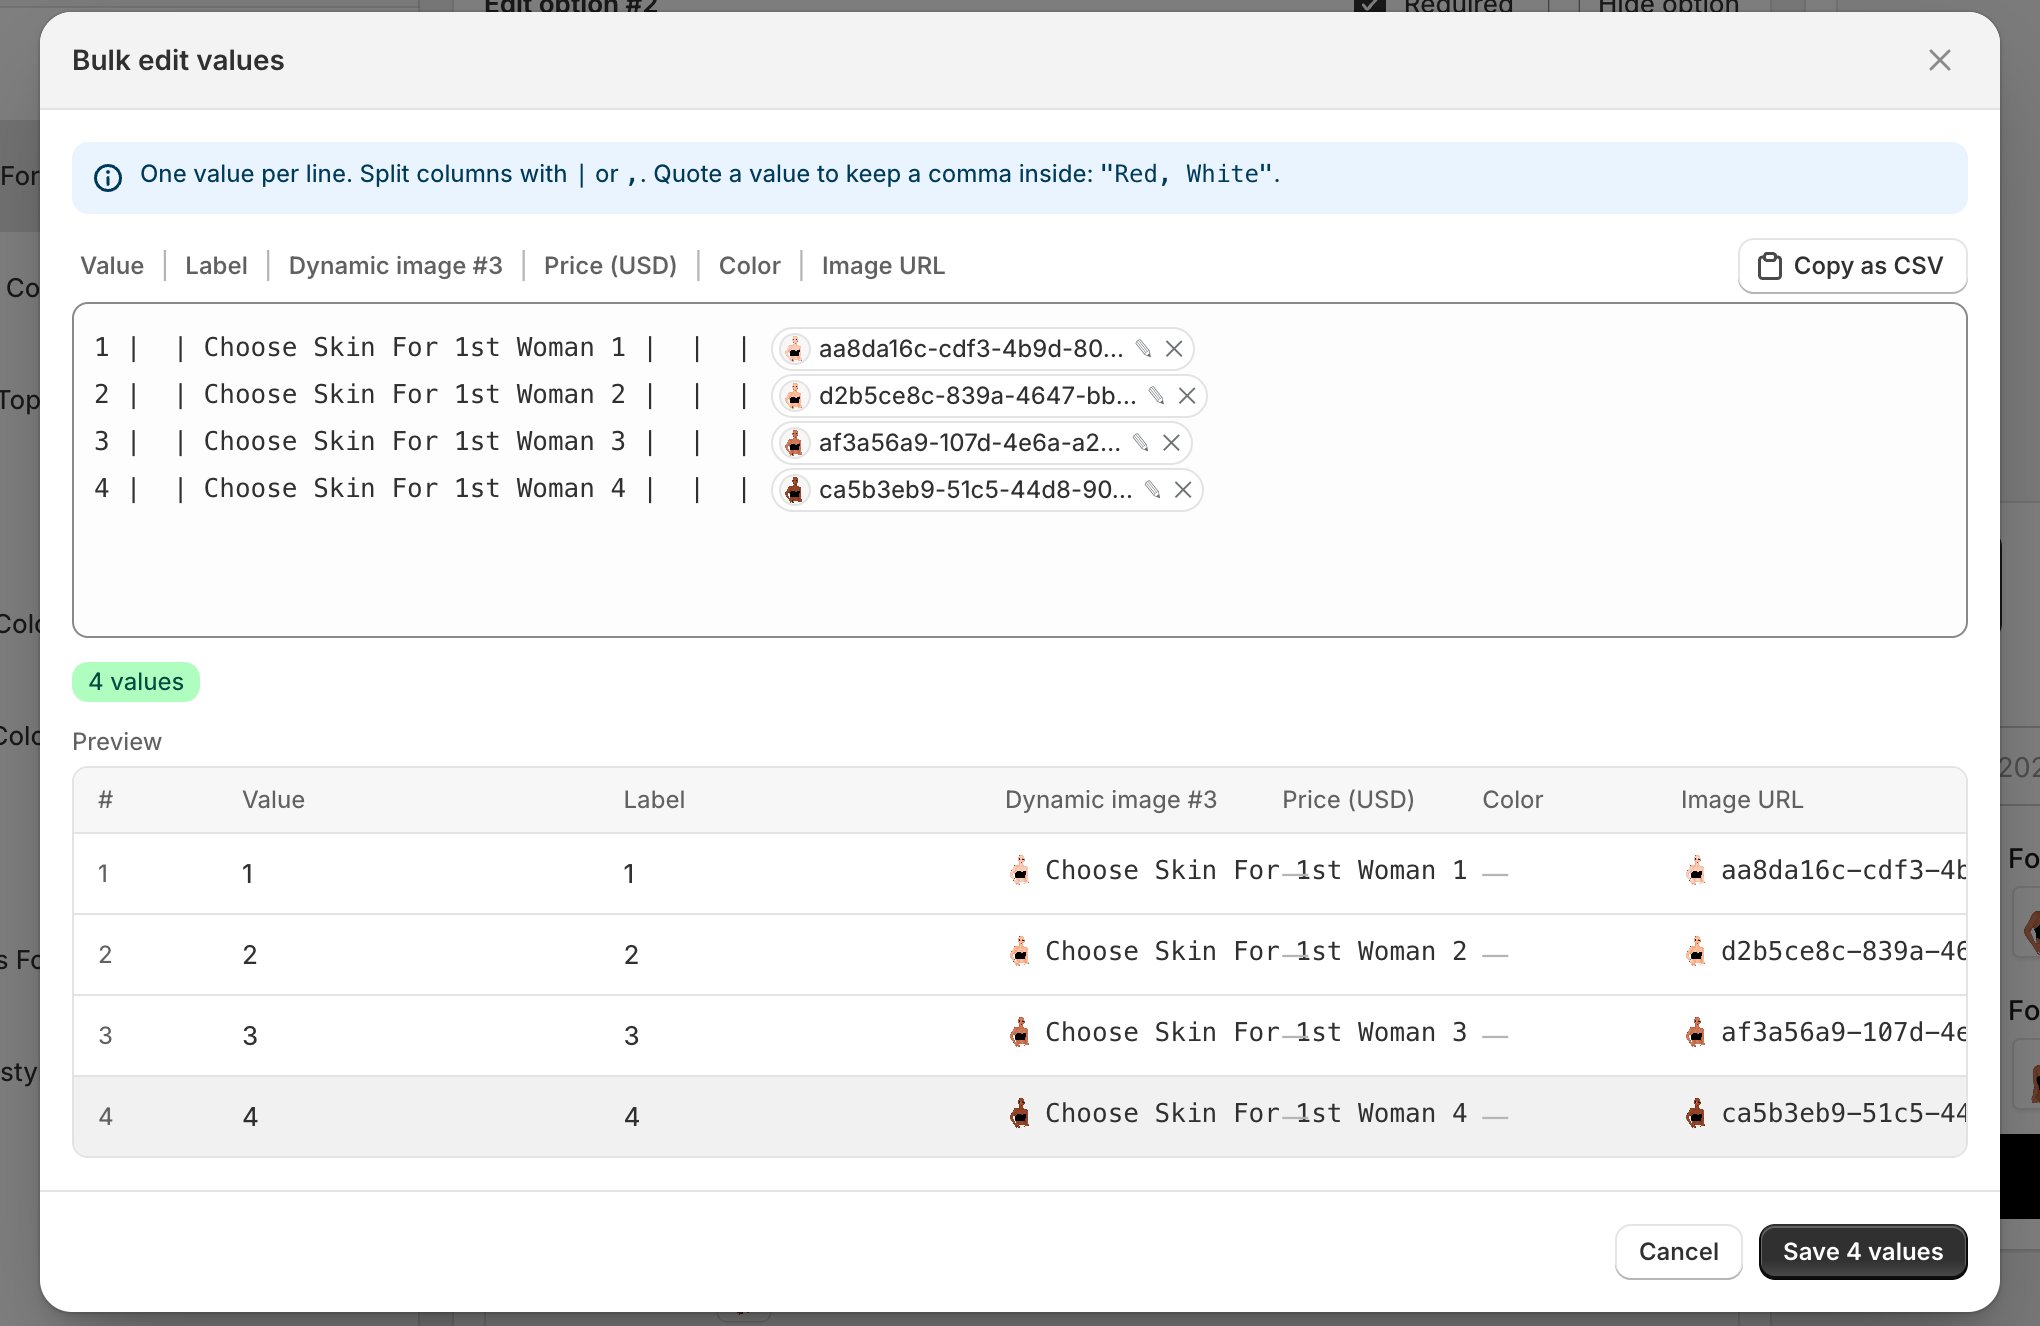
Adding forty ring sizes one row at a time is nobody's idea of a good afternoon. **Bulk edit** lets you work on the whole list as text: paste it in, check the preview, save.
Open an option, then click **Bulk edit** above its values.
 ## How to write the list
**One value per line.** Separate the columns on a line with either a vertical bar `|` or a comma.
The columns run in the order shown above the box, which depends on the type of option you are editing. A simple dropdown has fewer columns than a swatch tied to a design.
| Column | What goes in it |
| --------------- | ---------------------------------------------- |
| **Value** | The internal name that your design connects to |
| **Label** | What the customer reads on the product page |
| **Price (USD)** | An extra charge for this choice, if any |
| **Color** | The color shown on a color swatch |
| **Image URL** | The picture shown on an image swatch |
You do not have to fill every column. Leave one empty and it keeps whatever it had.
If a value itself contains a comma, wrap it in quotes so it is not read as two columns: `"Red, White"`.
## Check the preview before saving
Underneath the box, a green badge counts how many values were understood, and the **Preview** table shows exactly how each line will be saved, column by column.
Read that table before you save. It is the fastest way to catch a stray comma that has quietly split one value into two.
When it looks right, click **Save**. The button tells you how many values you are about to save, which is a useful last check against a miscount.
Bulk edit replaces the whole list, it does not add to it. Any value you delete from the text box is deleted from the option, along with the connection to your design that went with it.
## Getting your list out again
**Copy as CSV** copies the current list to your clipboard in spreadsheet form. That is handy for:
* Editing a long list in a spreadsheet, then pasting it back.
* Copying a set of values from one option to another.
* Keeping a backup before a big change.
Before reworking a long list, hit **Copy as CSV** and paste it somewhere safe. If the edit goes wrong you can paste the old list straight back in.
## Quick add
Next to **Bulk edit** sits **Quick add**. Where bulk edit is for typing a list yourself, quick add pulls values in from a library you have already built in your Assets, so a palette or a size run you use across products only has to be entered once.
## Where to next
Reorder, rename, and set a default.
Put a surcharge on a specific value.
The full set of option types.
Point values at layers in your design.
## How to write the list
**One value per line.** Separate the columns on a line with either a vertical bar `|` or a comma.
The columns run in the order shown above the box, which depends on the type of option you are editing. A simple dropdown has fewer columns than a swatch tied to a design.
| Column | What goes in it |
| --------------- | ---------------------------------------------- |
| **Value** | The internal name that your design connects to |
| **Label** | What the customer reads on the product page |
| **Price (USD)** | An extra charge for this choice, if any |
| **Color** | The color shown on a color swatch |
| **Image URL** | The picture shown on an image swatch |
You do not have to fill every column. Leave one empty and it keeps whatever it had.
If a value itself contains a comma, wrap it in quotes so it is not read as two columns: `"Red, White"`.
## Check the preview before saving
Underneath the box, a green badge counts how many values were understood, and the **Preview** table shows exactly how each line will be saved, column by column.
Read that table before you save. It is the fastest way to catch a stray comma that has quietly split one value into two.
When it looks right, click **Save**. The button tells you how many values you are about to save, which is a useful last check against a miscount.
Bulk edit replaces the whole list, it does not add to it. Any value you delete from the text box is deleted from the option, along with the connection to your design that went with it.
## Getting your list out again
**Copy as CSV** copies the current list to your clipboard in spreadsheet form. That is handy for:
* Editing a long list in a spreadsheet, then pasting it back.
* Copying a set of values from one option to another.
* Keeping a backup before a big change.
Before reworking a long list, hit **Copy as CSV** and paste it somewhere safe. If the edit goes wrong you can paste the old list straight back in.
## Quick add
Next to **Bulk edit** sits **Quick add**. Where bulk edit is for typing a list yourself, quick add pulls values in from a library you have already built in your Assets, so a palette or a size run you use across products only has to be entered once.
## Where to next
Reorder, rename, and set a default.
Put a surcharge on a specific value.
The full set of option types.
Point values at layers in your design.